Sensor settings
How to reach the settings of one sensor of the Hectare Mini, what every context menu holds, which settings are shared by a group, and which calibrations exist.
Every sensor, motor and actuator has its own context menu: its status screen, its parameters and, for some, a calibration. The parameters of each kind of sensor are in the topics that follow this one.
Reach a sensor
On the home screen hold “MENU” until the speed indicator has a white background. The panel is in the sensor setup mode. Release the button.
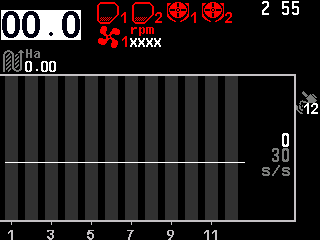
The sensor setup mode, the speed sensor selected. Select the sensor with “UP” / “DOWN”. A selected seed or fertilizer sensor shows its number under the column on a white background.
Press “MENU”. The context menu of the selected sensor opens.
Change a value with “UP” / “DOWN” and “PLUS” / “MINUS”, as in any menu. “BACK” closes the context menu; “BACK” once more leaves the sensor setup mode.
What the context menu holds depends on the kind of sensor, on the machine and on the access level. A parameter you do not see is either above your level or does not apply — the topic of each sensor says which.
The context menu
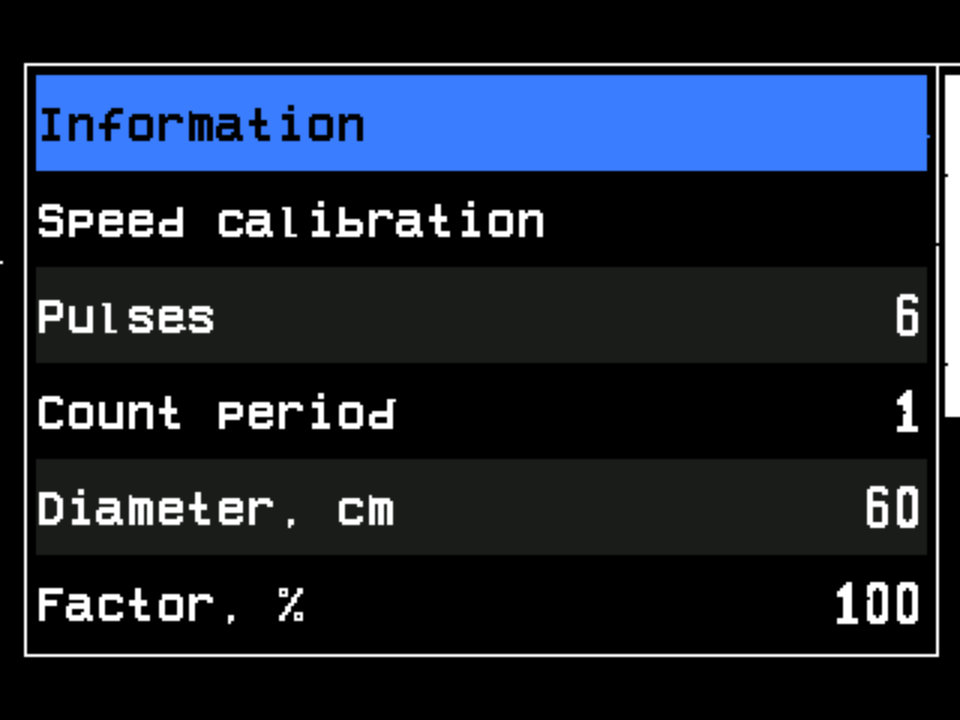
- “Information” — opens the status screen of this sensor. Every context menu starts with it. The sensor status screen
- An action of this kind of sensor — here “Speed calibration”. A dispenser sensor has “Dispenser calibration(weight)” instead; seed and fertilizer sensors have “Product application”.
- A parameter — here “Pulses” of the speed sensor.
- Its value. Select the line; the value stands between − and + and changes with “MINUS” / “PLUS”.
- Scroll bar. More parameters follow; the last item is “Reset to defaults”.
“Reset to defaults” returns the parameters of this sensor to the factory values. It needs the “Service” level and acts at once, without asking.
The context menu reached from the status screen with “MENU” has “Disable control” or “Enable control” as its first item instead of “Information” — see Take a sensor into or out of control.
One set for a group, or one per sensor
| Sensors | Settings |
|---|---|
| Seed sensors | One set for all of them. Change it on any seed sensor — it applies to every one. Only “Product application” is set per line. |
| Fertilizer sensors | One set for all fertilizer sensors, separate from the seed sensors. “Product application” per line. |
| All other sensors | Each sensor has its own settings — set every dispenser, fan or pressure sensor separately. |
Calibrations
| What it puts right | Where | Level | Machine |
|---|---|---|---|
| Travel speed — “Factor, %” of the speed sensor, over 100 m. Calibrate the speed sensor | “Seeding machine parameters” → “Speed calibration”, or the context menu of the speed sensor | Agronomist; from the context menu also Operator with a PIN | drives 100 m |
| Dispenser rotation — “Wheel, pulses” against “Dispenser pulses”. Calibrate the dispenser rotation | “Seeding machine parameters” → “Dispenser calibration” | Agronomist | drive wheel turned |
| Dispenser by weight — “Weight, gr” and “Weight, pulses”. Calibrate the dispenser by weight | context menu of the dispenser sensor → “Dispenser calibration(weight)” | Operator | standing |
| Dispenser motor by weight. Calibrate a motor by weight | context menu of the motor | Operator | standing |
The two weight calibrations are at the “Operator” level because they must be repeated whenever the product changes.
The kinds of sensor
Speed sensor · Seed and fertilizer sensors · Dispenser sensor · Fan sensor · Pressure sensor · Hopper and work position sensors · Engine sensors · Marker sensors · Dispenser motors
Something your machine does that this page does not answer? Write to support@agriwelt.com — an engineer answers.