The rate control screen
The screen for machines that apply products to a rate — what it shows, its three states, its colours, and how to reach the motors and their calibration from it.
On the rate control screen you set the target rates of seed, dry fertilizer, liquid fertilizer and the products applied by weight, and watch the rate actually applied. It also shows the area, the speed, the hoppers, the fans and the implement position. It is the last working screen: “HOME” from the Statistics screen (or the Motors screen) brings you here, and one more “HOME” returns to the home screen. “BACK” does not leave this screen.
It is the only screen the panel remembers over switch-off: if it was open, it opens again after the next switch-on.
What the screen shows
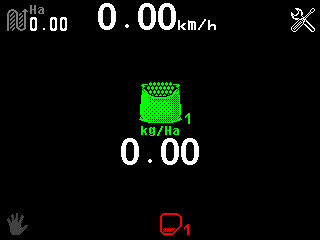
- Area worked on the active field, in ha. Only with a speed sensor.
- Travel speed, in km/h, with the same messages as on the home screen — see Speed. Only with a speed sensor.
- Settings symbol. Touch and hold it to open the main menu.
- Product indicator — here product 1, in kg/ha. One for every product that has at least one metering unit under control applying it by weight.
- Rate. The rate actually applied; while the indicator is selected, the target.
- Work pause — the hand. Dark grey: working; blinking yellow: application locked — see Lock application by hand.
- Hopper, one for every hopper.
Depending on the machine, more indicators appear: the target rate of liquid fertilizer in L/ha, the rate of seed and of dry fertilizer in the “Precise” mode, a fan indicator for every fan, and the implement position at the bottom right. If there is no room for all fans and hoppers, the panel drops first a fan, then hoppers; the home screen still shows them all.
Three states
- Observation — nothing is selected. The indicators show the rates actually applied.
- Rate change — “PLUS” or “MINUS”. The rate indicators can be selected; see Change the target rate.
- Sensor setup — hold “MENU”. The settings symbol, the speed, the fans, the hoppers and the implement position can be selected; “PLUS” and “MINUS” take the selected sensor into or out of control, “MENU” opens its context menu — or, on the settings symbol, the main menu.
In both modes “UP” and “DOWN” move the selection, “BACK” leaves the mode, and “HOME” held locks or unlocks application.
Colours of a rate indicator
| What you see | Meaning |
|---|---|
| Symbol and unit green, value white | In order; the value is the rate applied. |
| Symbol, unit and value blinking red | The rate applied deviates from the target more than allowed. |
| Dark blue-green background, light blue symbol, yellow value | Selected; the value is the target. |
| !!!!, XXXX or ???? blinking red (liquid fertilizer only) | Not under control / no connection / a device of the wrong type. |
In the “Precise” mode the seed and fertilizer indicators show the population in ks/Ha while not selected, and the target in s/m while selected.
The rate of a product is averaged over each 10 m of travel. It counts as deviating when it is off by more than “Product rate error,%”: the alarm comes after two such stretches in a row and clears after two good stretches. Standing still, with application locked, or with no metering unit under control, the indicator shows 0.00 and the alarm is cleared.
To the motors and their calibration
Touch and hold a product indicator — or select it in the rate change state and press “MENU”. A list of the motors of that product opens (“Motor” or “Fert.mot.” with the number). Select a motor and press “MENU”: “Calibration, product”, “Weight, gr” and “Rotations”. How to calibrate: Calibrate a motor by weight.
The list exists only for products whose motors work in “Flow” or “Hybrid”. If the machine is moving, the panel refuses: the speed must be zero for a calibration. A touch and hold on the liquid fertilizer indicator opens the context menu of the pump.
Something your machine does that this page does not answer? Write to support@agriwelt.com — an engineer answers.