Calibrate the speed sensor
Drive a marked 100 m so that the Hectare Mini corrects the factor of the travel speed sensor — started from the Seeding machine parameters or from the context menu of the sensor.
The calibration measures the distance the panel counts over a marked 100 m and corrects “Factor, %” of the speed sensor. Do it before the first seeding and after any change to the wheel or its drive. Set “Pulses” and “Diameter, cm” first (Travel speed sensor) — the calibration corrects the factor; it cannot replace a wrong pulse figure.
Mark out 100 m on level ground, as close to field conditions as you can, and put the machine at the start.
From the Seeding machine parameters
Raise the level to “Agronomist” (Enable the Agronomist level).
“Settings” → “Seeding machine parameters”, select “Speed calibration” and press “MENU”.
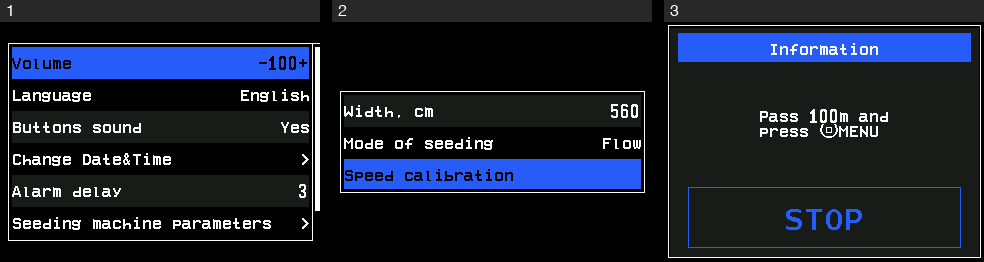
The way to the calibration: the Settings menu and the Seeding machine parameters, then the calibration window. The panel shows “Pass 100m and press MENU” with a “STOP” button. Drive the marked distance and stop at the end.
Press “MENU” or touch “STOP”. The panel shows “Done” and closes the window by itself.
From the context menu of the speed sensor
Hold “MENU” on the home screen, select the speed indicator, press “MENU”. The context menu opens.
Select “Speed calibration” and press “MENU”. The item is shown only while the machine stands.
At the “Operator” level the PIN pad opens: type the PIN of the Agronomist or Service level. At “Agronomist” the panel asks “Are you sure?” — press “PLUS” for “Yes”.
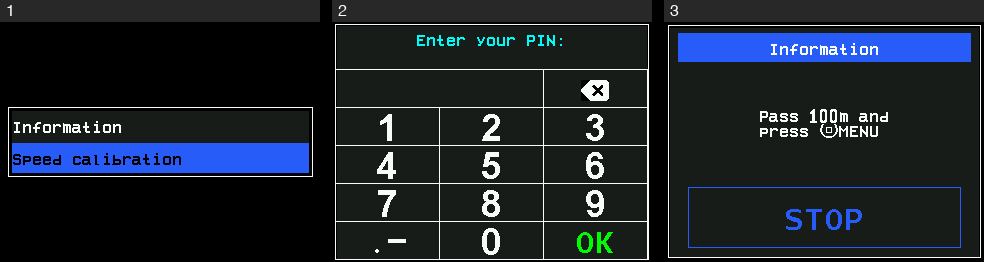
The calibration from the context menu: the item, the PIN request at the Operator level, the calibration window. Go on as in steps 3 and 4 above.
The PIN given here starts this one calibration; the access level stays as it was.
While the calibration runs, product application is locked; it returns to its state before the calibration when the window closes. The panel waits half a second after “STOP” and checks the connection to the sensor once more before it takes the result.
When it does not work
| The panel shows | Meaning |
|---|---|
| “No speed sensor” | The profile has no speed sensor. The calibration does not start. |
| “Connection lost with the sensor! Calibration canceled!” | The sensor does not answer — at the start, or at the moment of “STOP”. |
| “Sensor not controlled! Calibration canceled!” | The speed sensor is out of control. |
| “FAILURE! The tractor did not move!” | The sensor gave no pulses at all over the distance. Check the sensor, its gap to the target and its cable. |
| “Calibration canceled!” | The window was closed with “BACK” or a touch outside. Nothing has changed. |
| “Invalid PIN” | The PIN asked at the “Operator” level was wrong. The calibration does not start. |
If the speed on the panel still differs from the real speed after the calibration, check “Pulses” and “Diameter, cm” and calibrate again.
Something your machine does that this page does not answer? Write to support@agriwelt.com — an engineer answers.