Fill the disks with seeds
Turn the seed disks of a planter with dispenser motors until every disk holds seed, so that sowing starts from the first metre — how to run it and read the result.
This applies only to planters with seed dispenser electric motors in the “Precise” mode. Without seed motors in the profile, or in another mode, the menu item is not shown.
When the disks are driven by electric motors, they stand empty until the motors run. Drive off with empty disks and the first metres of every row get nothing: each disk first has to pick up seeds and carry them round to the drop point. Filling turns the disks while the machine stands still, so that sowing starts from the first metre.
Stop the machine. While it moves, the item is hidden.
On the home screen, press “MENU”. Select the first item, “Fill the disks with seeds”, and press “MENU”. It is open at every access level.
The panel asks for confirmation. Press “PLUS” or touch “Yes”. “MINUS”, “No”, “BACK” or a touch beside the window cancels.
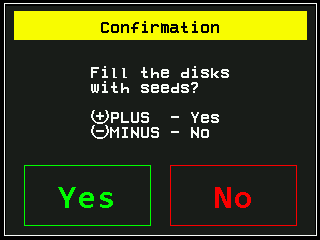
The question before the disks turn. Watch the tiles. Each motor turns its disk at 4 rpm of the driven shaft until the seed sensor of its row registers the first seed. While the operation runs, the bottom line tells you that “BACK” aborts it.
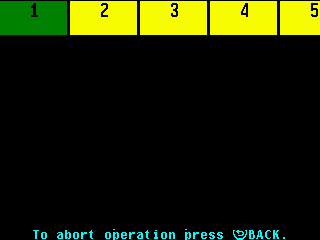
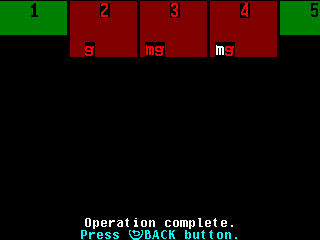
The operation running: tile 1 is done and green, the others are still turning. When every motor has finished, the panel gives three short beeps and shows “Operation complete.” Read the tiles at leisure, then press “BACK” to return to the main menu.
To stop early, press “BACK”: every motor stops at once, goes back to the seeding logic, and the screen closes. You can start again straight away. On this screen only “BACK” works; the other buttons and touches do nothing.
Reading the tiles
| Tile | State |
|---|---|
| Dark grey, full height | Waiting its turn — only eight motors run at once. |
| Yellow, upper part | Running: the disk is turning. |
| Green, upper part | Done: the seed sensor registered a seed. |
| Dark red, full height, bright red number | Failed: the disk could not be filled. The letters say why. |
A motor fails if no seed is registered within 1.25 turns of the shaft — about nineteen seconds. A motor that reports a fault is stopped and failed at once; a motor out of control does not turn and counts as failed. Extra motors without a seed sensor of their own turn their disks but are reported as failed, because no seed can be seen. Fertilizer motors take part only if they too run in “Precise”, each paired with the fertilizer sensor of the same number.
Letters on a failed tile
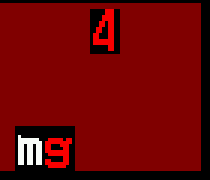
The letters stand always in the same places — m left, g middle, s right — and red means a fault, white means out of control.
| Letter | Meaning |
|---|---|
| m red | A fault of the motor during the operation. |
| m white | The motor is out of control and cannot run. |
| g red | The seed sensor saw no seed while the disk turned. |
| s red | A fault of the seed sensor during the operation. |
| s white | The seed sensor is out of control, or the motor has no seed sensor paired with it. |
If the seed sensor is out of control, a serviceable motor still turns the disk about one and a quarter turns, so the disk does get filled — but the panel reports a failure, because it never saw a seed.
Something your machine does that this page does not answer? Write to support@agriwelt.com — an engineer answers.